This will go down as the longest title I will ever come up with.
Friday I was a lucky recipient of a certain book.
Immediately we put it to the test.
Green Goddess Dressing? Awesome. Devoured on salad.
Veggie Potpie Stew? Tremendous. Eaten with Sweet Potato Drop Biscuits.
Just glancing through this book, I give it two eager thumbs way up, but don't take my word for it-the table of contents is available to preview on Amazon and I recommend you do so if you are interested. And if you are a gluten free type, as I am striving to be, you may be doubly interested- 97% of the recipes within Appetite For Reduction are gluten free or easily made that way by subbing out such things as soy sauce for wheat free tamari, flour to thicken stews like the above Veggie Potpie with arrowroot, etc.
I truly think that this will be the first cookbook I will try every recipe in. In fact, that is my plan, and my future for this blog. Get excited! More on that tomorrow.
Showing posts with label gluten-free. Show all posts
Monday, November 29, 2010
Friday, November 26, 2010
Vegan Mofo Day 20: Reese's can kiss my grits...
While I'm certain the food at Mel's Diner was on par with most diners of the day, I don't think they had these.... Nor does Hershey's, in case you're looking.
We started with the Chocolate, a bar each of Green and Black's Organic Dark and Theo's Organic Cherry Almond. Melt in a double boiler, just until the chocolate is melted and smooth. Turn off the heat but leave the bowl on to keep it warm. Don't get any water in it or it will seize on you. If the happens, add some fat to it, like coconut oil to loosen it back up. it won't be quite as good, but it will still work.
So it's a makeshift double boiler, but it works fine |
Next, the filling. In this case, we opted for almond butter cups, so some homemade almond butter mixed with nooch. The base recipe can be had here... so you can add your own ideas to it.
Somehow this doesn't SEEM appealing, but it tastes good. |
Next, add some cupcake liners to a pan... this to me is the easiest way to make these, and it also gives you those little ridges like on Reese's... you know, if you're into that sort of thing.
You could also use a mini pan, but this one is regular sized... |
Pour just enough chocolate into each mold to just coat the bottom, maybe an 1/8 of inch worth. Then spoon on some of the nut butter mixture.
Flatten it out a little with the back of the spoon to make it easier to cover and to press it into the chocolate below.
Don't have to press hard...just a tap... |
After that, spoon chocolate on the top until the butter mix is covered. Don't add more than what you need to cover it, otherwise it will be too thick. Oh, and you'll run out of chocolate and have to melt more. I mean, not that it's a bad thing to eat more, but if they get too thick, it's a little hard to bite through, especially if you prefer them frozen.
Ready for the freezer... and no the banana was not an ingredient. |
Refrigerate these for a couple hours until the chocolate is set, or if you prefer them frozen, they only need about 20 minutes in the freezer to be ready. Just pull them out of the pan and peel off the paper, and put them in an airtight container and stick them back in the freezer or fridge. Once cold they won't stick together, unless you leave them out too long. The container is to prevent freezer burn or moisture build up, but if they last long enough for that, you're doing it wrong.
These didn't last long; less than two days in fact, and I only got 2 or 3 of them. That's OK though, I know where I can get more.
*A note from Rach: I didn't tell the chrisasaurus beforehand, but this recipe is scaled up from Averie's Raw Peanut Butter Cups (with almond butter subbed for peanut butter, obviously).
Thursday, November 25, 2010
Vegan mofo Day 19: Thanksgiving!
There are ten minutes left to this day and the holiday before it officially becomes "Christmas Season" and Black Friday. But I'm here with today's eats:
This is the filling-sadly there is no final put together shot with the mashed potatoes. It was devoured by omni and veg alike too quickly! We used chickpeas instead of tempeh and it turned out fantastic.
A family member has recently been instructed to be gluten free for health reasons, and mentioned that baked goods were one thing that they missed. We brought these cupcakes which were very well received by the omnivore crowd. They were eaten over the pumpkin and pecan pies also present today.
As for our meal, husband and I needed a simple and portable dish since we were traveling across town to visit family. We prepared the shepard's pie up until the point of baking it in the oven and then drove over, finally popping it into an oven about 40 minutes later. This was also made gluten free, as we replaced the flour in the recipe with arrowroot in the gravy. It came out amazing, leaving me to wonder: why have I never tried shepard's pie before?
I am thankful for many things today, one being the path of veganism which has led me to try new things.
![]() |
Tempeh Shepherdess Pie filling from Veganomicon. |
![]() |
Chocolate Gluten Freedom Cupcakes from Vegan Cupcakes Take Over The World |
As for our meal, husband and I needed a simple and portable dish since we were traveling across town to visit family. We prepared the shepard's pie up until the point of baking it in the oven and then drove over, finally popping it into an oven about 40 minutes later. This was also made gluten free, as we replaced the flour in the recipe with arrowroot in the gravy. It came out amazing, leaving me to wonder: why have I never tried shepard's pie before?
I am thankful for many things today, one being the path of veganism which has led me to try new things.
Tuesday, November 23, 2010
Vegan MoFo Day 17: Raw Energy? Bars
So, I don't know what to call these treats, really. They are sort of like Larabars, which are billed as energy bars sometimes? When I think of energy bars, I think of cardboard coated in chocolate that tastes like a sock. These are so not that.
There are many, many recipes out there for "lara" type bars. Try googling your favorite flavor + the word "recipe" to see what sort of results you get. Probably at least one or two. I do like to eat them, and other brand name raw energy bars, though they can be costly and don't taste quite as fresh as the ones I can make at home. And boy, do we ever make these at home. They are "cookies" to my almost 3 year old. Packed full of nutrition, I'm not going to complain if she wants to call them that.
Today I'm going to make a chocolate-cashew variety, but I want to say now that you can use any kind of nuts you like! And the chocolate can be optional. Or replaced with carob powder. Mesquite powder also makes an interesting add-in (use just a little, though!) Spices are also a nice touch-cinnamon, as an example. This is the sort of thing that can't be horribly screwed up, so feel free to experiment. Actually, this recipe started out as a quick experiment when my kiddo wanted a cookie, now! while I was trying to make an uncheesecake crust she was determined to eat if I didn't get her something else to nibble on.
First step, gather some ingredients.
![]() |
Hemp seeds, Flax Seeds, Cacao Powder, Medjool Dates, Cashews, Chia Seeds. Everything raw & organic. Not pictured: Vanilla Extract, Pink Himalayan Salt. |
Grind the nuts for several seconds alone, until finely chopped.
![]() |
These are almonds (for another upcoming post), not cashews, but you get the idea |
You'll have a nicely ground mix of dates and nuts after you let it process for a moment.
Stop the machine. You officially have an energy bar. You can stop here if you like. One of my favorites is just pecans and dates mixed together. Or, throw in some other fun things you may like. I believe I added about 2 tablespoons each of chia, flax and hemp seeds.
Note that pre-grinding your flax into meal is ideal if you want it completely ground when making things in a food processor. I forgot here. But that's okay, it's still good.
Now add cacao powder! About 1/2 cup. This is completely dependent on you and your taste buds. Here is where I add some vanilla extract (alcohol free is preferred for raw desserts, but whatever you got!) and a pinch of pink Himalayan salt (less than 1/4 tsp).
Run the machine for a minute or so, and things will start binding together in a gooey yummy mess. Now let's make cookies!
![]() |
All the fun of baking without the hot oven to contend with. |
![]() |
A flower cookie for C-bear from Daddy, left most section. |
Ani Phyo has a great cookie recipe in her dessert book, Carob Walnut Cookies. They follow the same basics as discussed here, and she puts her cookies in the freezer-this is how I learned I like them really cold!
See you tomorrow!
Labels:
gluten-free,
Raw,
recipe,
V for Awesome,
Vegan MoFo 2010
Friday, November 19, 2010
Vegan Mofo Stardate 14 : Roll with it baby!
So, lets talk Spring rolls (no, not old 80s songs as implied by the title). So, these were made at the direction of my wife, who, I might add, likes Spring rolls. A lot. Particularly the ones from a certain Thai place we happen to currently frequent. Truth be told, I do to, so it's not like I'm complaining here; except when she eats all any of mine.
What we were really going for here was a raw roll, or at least mostly raw, in that once made, we wouldn't actually cook the rolls. As it turned out, some of the ingredients in these were cooked, but the roll itself and the accompanying dippin sauce were raw.
You'll need:
1 pkg of Spring roll wrappers.
There are so many varieties of these I can't begin to tell you which ones to buy specifically, but you want ones that are for all purpose use, not frying. Generally, the frying only ones are the "rice paper" kind, and the general purpose ones are wheat based. You can also get them in many shapes and sizes. The particular ones I used this time were dried triangular Vietnamese wrappers. Next time I have a batch of frozen larger square ones to use.
Something large enough to hold the wrapper so it can soak in
Water
As for the filling:
This time around I used shredded Napa cabbage (1 whole head)
shredded raw carrots
some pre roasted green beans
a lightly toasted combination of 1/4 cup of each of the following (6-7 minutes in a 350 oven)
Amaranth, sesame seeds, ground up cashews and ground up walnuts
If you want to leave these raw, I'd swap the amaranth for Hemp or Flax seed instead. Totally up to you, I just chose these because they are mild in flavor.
To make a roll, soak the wrapper in the water for about 15 seconds, until it gets soft. Don't leave it in too long or else it'll turn to mush. Also, once you take it out of the water it will continue to soften until it starts to dry, so don't worry if it's a little stiff when you take it out.
Add the filling ingredients at the bottom, being careful not to over stuff. For these wrappers, you'll notice i put everything in the middle at the bottom of the larger rounded edge. This gives you the ability to fold the sides over before you finish rolling in the vain hope that your filling won't fall out of the ends when you pick it up or bite it. I used about a tablespoon each of the cabbage and carrots, added 1 or 2 beans, then a tsp or 2 of the seed and nut combo.
Once you get everything added, roll up by first lifting the bottom up and over the stuffing, then pulling it back to tighten it up and get it started. Fold the ends over toward the middle, making sure to tuck the wrapper over the filling. You want to fold it once, then go back and pull the little flap that's left over into the middle too. It's hard to explain, but once you do it a few times, you'll see what I mean. If everything falls out, don't panic, just start over. If the wrapper tears, just get a new one, no big deal. The art of making these is something that takes patience and practice, so just hang in there and you'll get it. For reference, the first time I made rolls, I put the ingredients on the wrong end and couldn't for the life of me figure out why they wouldn't roll up correctly. It's all about the skills.
Finish rolling by using your index fingers in the middle, and your middle fingers on the ends, and roll it up, keeping it taught, but not so tight it tears. You can feel the wrapper stretch as you roll, and that's ok. Once you reach the top, make sure to gently press the little pointed part down so that it will bond to the rest. Place it on a cookie sheet to sit for a few minutes, so that the wrapper sticks to itself and seals up the roll. Were you going to fry them, that would be the time, but as I said we chose not too.
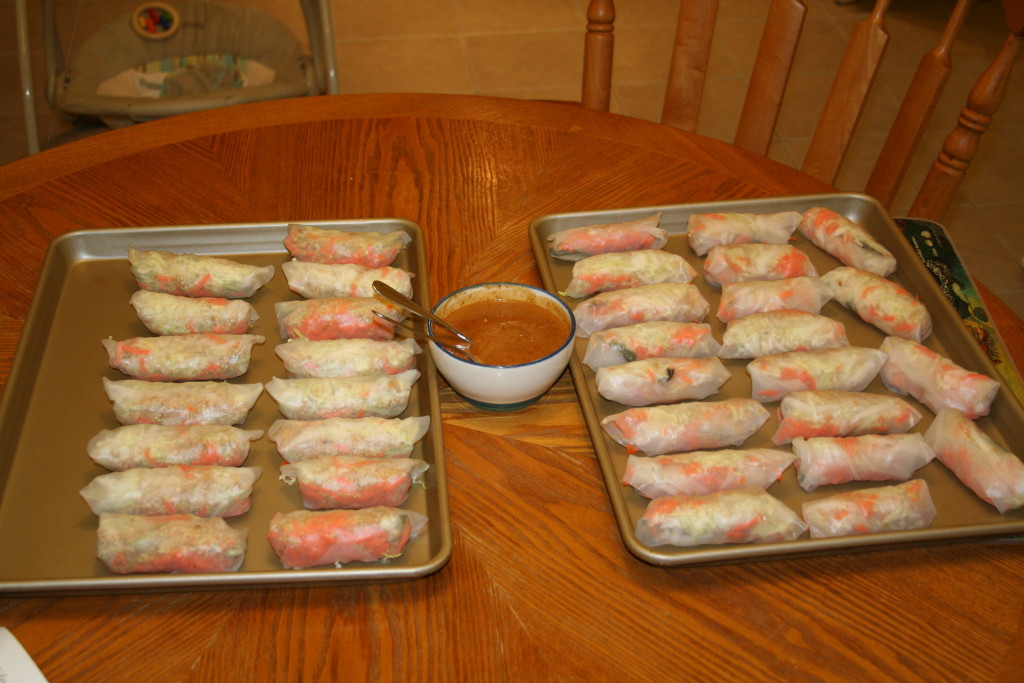
After I ran out of beans, I switched to shredded broccoli slaw. I let them sit for about 10 minutes (after I made the last one) before serving them. In the end I stopped because I ran out of wrappers. As you can see I did get quite a few done. After they sit, they will be a little gummy, but they won't stick to your mouth when you eat them. With all the crunchy veggies inside, the texture of the wrapper gets lost pretty easily.
If you can name that show.. you win a cookie.
ANYWHO...
Somewhere in there I made the dippin sauce.
Raw Nut dipping sauce
1/2 cup raw almond butter
2T Tamari
1/4 cup water
1T of Rice Vinegar
a few dashes of Sriacha (or Asian chile sauce)
tsp of garlic powder
tsp of date sugar
I whipped this up in a bowl with a whisk for a minute or so. If you like yours thick like, leave out a tablespoon of the water. This was pretty thick to begin with, so experiment a little with what works best for your desired consistency or flavor. One idea I have is swapping the Tamari with Coconut Aminos...
All was eaten with great fervor by the wife and I. C to her credit tried one, but didn't like the wrapper, so she got something else to eat instead. As far as the filling goes, you could really use about anything. Any crunchy item works well as the base, so any cabbage, or crunchy raw veggie is good (oooooo, I wonder what shredded jicama would be like in these!!!). Rice noodles would work too, just make sure to soak them first to soften them. We would have added avocado to ours, but ours were bad and so we missed out on that. The great part is that since these aren't cooked, you don't have the issue of things releasing water and making the roll soggy, so you can use mushrooms, and the like. I know I used some cooked ingredients, but I'm labeling these as raw because it's very easy to make them that way. I liked the idea of lightly toasting the seeds and nuts for extra flavor, but it's certainly not required. Go crazy, I won't tell.
What we were really going for here was a raw roll, or at least mostly raw, in that once made, we wouldn't actually cook the rolls. As it turned out, some of the ingredients in these were cooked, but the roll itself and the accompanying dippin sauce were raw.
You'll need:
1 pkg of Spring roll wrappers.
There are so many varieties of these I can't begin to tell you which ones to buy specifically, but you want ones that are for all purpose use, not frying. Generally, the frying only ones are the "rice paper" kind, and the general purpose ones are wheat based. You can also get them in many shapes and sizes. The particular ones I used this time were dried triangular Vietnamese wrappers. Next time I have a batch of frozen larger square ones to use.
Something large enough to hold the wrapper so it can soak in
Water
As for the filling:
This time around I used shredded Napa cabbage (1 whole head)
shredded raw carrots
some pre roasted green beans
a lightly toasted combination of 1/4 cup of each of the following (6-7 minutes in a 350 oven)
Amaranth, sesame seeds, ground up cashews and ground up walnuts
If you want to leave these raw, I'd swap the amaranth for Hemp or Flax seed instead. Totally up to you, I just chose these because they are mild in flavor.
The assembly table... |
To make a roll, soak the wrapper in the water for about 15 seconds, until it gets soft. Don't leave it in too long or else it'll turn to mush. Also, once you take it out of the water it will continue to soften until it starts to dry, so don't worry if it's a little stiff when you take it out.
Lika dissa... |
Add the filling ingredients at the bottom, being careful not to over stuff. For these wrappers, you'll notice i put everything in the middle at the bottom of the larger rounded edge. This gives you the ability to fold the sides over before you finish rolling in the vain hope that your filling won't fall out of the ends when you pick it up or bite it. I used about a tablespoon each of the cabbage and carrots, added 1 or 2 beans, then a tsp or 2 of the seed and nut combo.
The order does.....not matter |
Once you get everything added, roll up by first lifting the bottom up and over the stuffing, then pulling it back to tighten it up and get it started. Fold the ends over toward the middle, making sure to tuck the wrapper over the filling. You want to fold it once, then go back and pull the little flap that's left over into the middle too. It's hard to explain, but once you do it a few times, you'll see what I mean. If everything falls out, don't panic, just start over. If the wrapper tears, just get a new one, no big deal. The art of making these is something that takes patience and practice, so just hang in there and you'll get it. For reference, the first time I made rolls, I put the ingredients on the wrong end and couldn't for the life of me figure out why they wouldn't roll up correctly. It's all about the skills.
I couldn't take pictures and roll at the same time... so work with me here! |
Finish rolling by using your index fingers in the middle, and your middle fingers on the ends, and roll it up, keeping it taught, but not so tight it tears. You can feel the wrapper stretch as you roll, and that's ok. Once you reach the top, make sure to gently press the little pointed part down so that it will bond to the rest. Place it on a cookie sheet to sit for a few minutes, so that the wrapper sticks to itself and seals up the roll. Were you going to fry them, that would be the time, but as I said we chose not too.
1 down.. 4 bajillion to go |
These ones have peanuts and soap in them!!!! |
ANYWHO...
Somewhere in there I made the dippin sauce.
Raw Nut dipping sauce
1/2 cup raw almond butter
2T Tamari
1/4 cup water
1T of Rice Vinegar
a few dashes of Sriacha (or Asian chile sauce)
tsp of garlic powder
tsp of date sugar
I whipped this up in a bowl with a whisk for a minute or so. If you like yours thick like, leave out a tablespoon of the water. This was pretty thick to begin with, so experiment a little with what works best for your desired consistency or flavor. One idea I have is swapping the Tamari with Coconut Aminos...
That's right..I'm awesome. The pan on the right has the string beans, broccoli slaw on the left. It didn't matter..for them. |
Thursday, November 18, 2010
Vegan MoFo Day 13: Almond Pulp Cookies
One of the (delicious) side effects of making your own creamy almond milk at home is all the lovely almond pulp that we have leftover. (I sometimes dream of Alots of almond pulp.) In efforts to use it up (read: keep it from taking over the refrigerator and the freezer) I have been experimenting with dehydrator cookies combining it with other fun superfoods to eat.
You know you are not used to blogging when you get about halfway through a project and then think, "Hey, I should take pictures. I could blog this!" This is sort of what that scenario might look like.
Using the Macaroon recipe from Raw Food Real World and this recipe found by Googling as a guide, I combined a big mess of stuff into a bowl.
They were really good, though next time I might dehydrate them a bit longer-I love these cookies crunchy! I also love how the dried fruit rehydrates a bit and takes on a new texture.
To make this recipe, I used leftover pulp from about 3 batches of almond milk-so 3 cups of almond milk pulp total. This is a rough guesstimate and can be tweaked in either direction.
Leftover Almond Dehydrator Cookies
3 cups of almond milk pulp
1 cup of goji berries
1 cup of cranberries
1/4 cup cacao nibs
3/4 cup shredded unsweetened coconut
1 and 1/2 cups maple syrup (actually a bit less)
1/2 cup coconut oil, melted
3 Tbs Chia seeds
(I would use flax meal and hemp seeds next time-I was out this day!)
Cacao powder. Several heaping tablespoons. I would guess about 1/4-1/3 cup, but there will be an accurate measurement after I make them again!
I used the smallest size scooper we have-a size 60, or 2 tsp. Place them on your trays, turn the dehydrator on to 105, and let it run until your cookies are as dry as you like, about 16-24 hours. And enjoy! I think I will go have a couple more myself now.
You know you are not used to blogging when you get about halfway through a project and then think, "Hey, I should take pictures. I could blog this!" This is sort of what that scenario might look like.
![]() |
The olives were not part of the recipe. |
Using my hands I mixed it all up, and then scooped the mix all fancy-like into a cookie scooper. (I like that word, scoop. Scooooop).
And then scooped them onto a dehydrator screen.And popped them into the dehydrator.
And after about 16 hours, ate them.![]() |
There were a few more than this leftover, but not many. |
They were really good, though next time I might dehydrate them a bit longer-I love these cookies crunchy! I also love how the dried fruit rehydrates a bit and takes on a new texture.
To make this recipe, I used leftover pulp from about 3 batches of almond milk-so 3 cups of almond milk pulp total. This is a rough guesstimate and can be tweaked in either direction.
Leftover Almond Dehydrator Cookies
3 cups of almond milk pulp
1 cup of goji berries
1 cup of cranberries
1/4 cup cacao nibs
3/4 cup shredded unsweetened coconut
1 and 1/2 cups maple syrup (actually a bit less)
1/2 cup coconut oil, melted
3 Tbs Chia seeds
(I would use flax meal and hemp seeds next time-I was out this day!)
Cacao powder. Several heaping tablespoons. I would guess about 1/4-1/3 cup, but there will be an accurate measurement after I make them again!
I used the smallest size scooper we have-a size 60, or 2 tsp. Place them on your trays, turn the dehydrator on to 105, and let it run until your cookies are as dry as you like, about 16-24 hours. And enjoy! I think I will go have a couple more myself now.
Labels:
gluten-free,
Raw,
recipe,
V for Awesome,
Vegan MoFo 2010
Wednesday, November 17, 2010
Vegan MoFo Day 12: Lunch
A typical adult lunch around here is salad, full of yummy things. I enjoy it layered with a very light drizzle of dressing. Today's salad was washed fresh lettuce and baby spinach, broccoli sprouts, walnuts, pumpkin seeds, cranberries, and tamari roasted chickpeas. My broccoli & carrot slaw wasn't looking good so I skipped it today, sadface. Exciting posts about salads are here and here. Well, exciting if you are a salad nerd like me. Also pictured: My future avocado snack and my "green" smoothie.
Today the C-bear had chickpeas, a small Rhode Island style pizza, smoothie, and carrot sticks for lunch.
Monday, November 15, 2010
Vegan MoFo Day 11: Our Parm
I love nooch. Nutritional yeast, if you aren't familiar with the term. It's a vegetarian B-12 supplement that resembles "cheese" in its color and slightly in flavor. It's not the same thing as cheese though, so don't expect that! I love nooch so much, I like to eat it on its own sometimes.
A bit dry, a little chewy, but dang, so good.
The other day, my two year old asked for some nooch from the jar. Not on anything in particular, just plain nooch. That's my girl.
Nooch is an important ingredient in the vegan parmesan I make. My recipe is made with stuff we generally have on hand based on the recipe from Yellow Rose Recipes by Joanna Vaught. (Limited copies left! If you want this book, now is the time! It is one of my favorites.) It's great to use around the house and we even take it with us to the local pizza place-order a pie without cheese and apply your parm liberally.
1/3 cup of hemp seeds
1/3 cup of walnuts
1/3 cup of nooch
1/3 cup of brown rice flour
1/2 tsp salt
I use our stick blender's chopping attachment to waz this up. It's kinda handy for small jobs like this.
30 seconds or so should do the trick.
And then I pour it in the stainless steel shaker can, for easy distribution.
A widemouth canning jar funnel work perfectly and keeps me from making a mess. I need all the help I can get.
Slap a label on it if you are so inclined, stick it in the fridge and call it done.
This is great on pizzas, pasta, soups, salads, just about anything you might have eaten parmesan on and some things you didn't think of before (I never was one to put parm on pizza pre-vegan, though my husband did). Enjoy!
Thursday, November 11, 2010
Vegan MoFo Day 9: Are We There Yet?
What, this MoFo thing isn't over yet? Are you sure? It feels like I've been blogging about food for like forever. Okay maybe not really forever. It's more like I-Make-Up-Posts-All-The-Time-But-Forget-Them-Almost-Instantly, thus putting me into a perpetual state of feeling like I've already talked about something awesome.
Today I'm going to talk about something awesome I have already talked about. Oh no wait, Husband did. Back here.
Ever have one of those wearying days of working, errands, shopping, kid shuttling, and other fun awesome modern things to do? Sometimes you just want to cook a nice easy meal at the end of the day and not dirty every dish and spend an hour or more to do it. This is that recipe that saves us on those days, like today. Added bonus: It passes the two year old taste test with gusto.
Our Generic Throw What You Got In Stir Fry (Reprise)
This makes enough for 2 if it's all you're eating, 4 if it's a side.
Feel free to add any veggies you find to your liking. Any long cooking or frozen veggies would need to go in before hand (alternatively you could steam them first, then toss them around at first just to give them a little color.
Today I'm going to talk about something awesome I have already talked about. Oh no wait, Husband did. Back here.
Ever have one of those wearying days of working, errands, shopping, kid shuttling, and other fun awesome modern things to do? Sometimes you just want to cook a nice easy meal at the end of the day and not dirty every dish and spend an hour or more to do it. This is that recipe that saves us on those days, like today. Added bonus: It passes the two year old taste test with gusto.
Our Generic Throw What You Got In Stir Fry (Reprise)
This makes enough for 2 if it's all you're eating, 4 if it's a side.
- 3-4 TBS Canola, Peanut or other light tasting "saute friendly" oil. You could also use Coconut oil if you like that taste in your rice
- 2 Cups frozen peas
- 4 cups cooked rice (fresh or even better, cooked and then refrigerated)
- 1 tsp Sesame seed oil (regular or toasted)
- 2 tsp Garlic powder
- 2 tsp Onion powder
- 1 tsp Mustard seed powder
- 1/4 Cup Low Sodium Tamari, Shoyu or Soy Sauce
- Optional, and fun:
- Any other veg you have on hand, chopped evenly and finely-shown is broccoli slaw from Trader Joe's and red pepper in addition to peas
- Cashews or peanuts
- mushrooms!!
- Sriracha, or another hot sauce
- Seitan (the white steamed seitan from Viva Vegan was an excellent choice for us once) or tofu
Feel free to add any veggies you find to your liking. Any long cooking or frozen veggies would need to go in before hand (alternatively you could steam them first, then toss them around at first just to give them a little color.
Labels:
gluten-free,
Kid's Meal,
recipe,
V for Awesome,
Vegan MoFo 2010
Wednesday, November 10, 2010
Vegan MoFo Day 8: Make Your Own Adventure in Nut Butters
Nut butter can be expensive. Especially the raw kind. Unless you live near a Trader Joe's or your grocery store has a wider selection than the standard peanut butter you might not even see such awesome choices as almond, brazil nut or cashew butters. My grocery stores have such offerings in the "healthy" food section-ringing up at $8 to $12 dollars a jar. Ouch!
We are lucky to have a lovely local food co-op that allows members to make bulk purchases as needed. This makes purchasing organic, raw nuts very affordable for our family. Last month we found on sale and purchased a 25 pound case of organic almonds for nut milks, butters and raw desserts, a 25 pound case of walnuts for the same purposes, and the month before that a 25 pound case of cashews for, you guessed it, nut milk, butters and raw desserts. Cashews also lend themselves to making raw cheeses and pates. So much fun! The other night, Husband and I realized we were nearly out of tahini-and having just picked up a 5 pound bag of sesame seeds, I decided to embark on a tasty nut butter adventure of the mediterranean type. Step 1-Get out your food processor.
Step 1 can also involve a Vita Mix or Blendtec blender. But I tend to make a large batch at once and the food processor is my chosen implement of destruction.
Step 2-Pick your nuts/seeds. As we mentioned, Sesame is on the menu today. Don't like raw butters? Roast your sesame seeds first in an oven on low heat for a couple of minutes.
Step 3-Add to food processor bowl. Guesstimate about how much you want to put in there. There's no right or wrong answer.
Step 4-Turn it on!
Now we play the waiting game. I find that sesame seeds, cashews, and walnuts turn into butter fairly quickly. Raw almonds will take the longest, at upwards of twenty minutes. Yep, twenty. Just when you think you are wasting your time and the food processor starts to overheat, bingo-you hit the sweet spot of creamy nut butter.
Luckily, it's not hard to tell when you've reached it.
I sort of timed how long this batch took to make. And by sort of, I mean not really. And by timed, I mean I took pictures of the wall, floor, ceiling, entire kitchen complete with Husband not paying attention (I can't really believe I'm going to post it, the mess makes me cringe), the kiddo as she runs in and out of the room, the baby as she watches me in the swing, and some more shots of the food processor spinning. Outtakes, you know.
Back to the nut butter. 3? 5? minutes later, I stopped the machine, scraped the sides and turned it back on. And watched.
Let's discuss the Almost-There-But-Not-Really issue. At some point you will see the butter forming a large ball and the standard reaction is "Ding! Butter done!"
No. It is not.
Scrape down the sides and keep going. Just a few more moments, I promise. It could be 30 seconds, it could be 2 minutes, but the ball will disappear and then the real creaminess will shine through with all the natural nut oils helping things along.
After the ball disappears, check the machine periodically, as is comfortable for you. I don't really think this sort of thing can be over processed, so go ahead and stare at the wall for awhile do something productive for a moment.
I know there's not much difference between the last picture and this one, despite this one having a strange color cast (I fail at fixing in Photoshop) but when you are actively doing this in the field, you will be able to tell the difference by touching and tasting. Also if you try to spread it on something, the texture will be evident. Practice! Do not be disappointed by small set backs! This is the advice I have for you.
Step, um, I forget. Pour your butter into a glass mason jar, recycled other-kind-of-jar, plastic tub, whatever floats your boat. Label and enjoy. No matter what direction your adventure takes, the results are just as tasty. Now if you'll excuse me, there are some almonds that need to be pulverized in the refrigerator. Huzzah!
We are lucky to have a lovely local food co-op that allows members to make bulk purchases as needed. This makes purchasing organic, raw nuts very affordable for our family. Last month we found on sale and purchased a 25 pound case of organic almonds for nut milks, butters and raw desserts, a 25 pound case of walnuts for the same purposes, and the month before that a 25 pound case of cashews for, you guessed it, nut milk, butters and raw desserts. Cashews also lend themselves to making raw cheeses and pates. So much fun! The other night, Husband and I realized we were nearly out of tahini-and having just picked up a 5 pound bag of sesame seeds, I decided to embark on a tasty nut butter adventure of the mediterranean type. Step 1-Get out your food processor.
![]() |
Just don't do whatever the Warning is telling you not to do. Pick up spiny sea urchins? Throw Ninja Stars? You decide. |
Step 2-Pick your nuts/seeds. As we mentioned, Sesame is on the menu today. Don't like raw butters? Roast your sesame seeds first in an oven on low heat for a couple of minutes.
![]() |
Yep, Sesame Seeds. Says so right there. |
![]() |
This will work. |
![]() |
Spin baby spin. |
Luckily, it's not hard to tell when you've reached it.
![]() |
This is not it. Keep going. |
![]() |
But don't tell your husband you took this photo, just post it on the blog. He loves surprises. |
![]() |
Entertaining for a short while. |
No. It is not.
![]() |
Close! |
![]() |
In the meantime, pour all those tiny seeds into a giant container. Don't spill them. You'll think you swept them all up but in fact will be finding them years later, trust me on that one. |
![]() | ||
Fin: Creamy, delicious nut butter. |
Step, um, I forget. Pour your butter into a glass mason jar, recycled other-kind-of-jar, plastic tub, whatever floats your boat. Label and enjoy. No matter what direction your adventure takes, the results are just as tasty. Now if you'll excuse me, there are some almonds that need to be pulverized in the refrigerator. Huzzah!
Labels:
gluten-free,
Raw,
recipe,
V for Awesome,
Vegan MoFo 2010
Subscribe to:
Posts (Atom)